Thursday, May 31, 2012

Baby O: 28 Weeks

Baby O
How far along? 28 Weeks
Maternity clothes? Almost always. I was blessed with TONS of cute clothes for my birthday so I've been enjoying my new wardrobe this week.
Stretch marks? Still going strong without any, very thankful!
Movement: He moves all the time and has been distorting my stomach like crazy the past few days. He's already measuring taller than normal so he must be getting smooshed in there, poor guy still has almost 12 more weeks to go.
Food cravings: Still consuming milk like crazy, we go through more than 4 gallons a week so I make even more frequent trips to Costco!
Can't resist: Shopping... I was pretty good this week, but we did find an amazing rug for the nursery so now our focus is getting everything else settled in.
Gender: Boy.
Symptoms: Can't complain...I've had a very easy pregnancy.
Belly Button in or out? Out and showing through most my clothes.
Projects This Week: Painting the armoire and my most ambitiouis project to date. It should be finished up this weekend and I'll have a big reveal for you next week!
Looking forward to: Going through the mounds of clothing and getting it all organized. And meeting Baby B, should be arriving by the end of the week!

Friday, May 25, 2012

Upcycled Baby Armoire

We found a great set of nursery furniture for Baby O. It is very nice (and extremely heavy!) furniture, but one of the pieces was pretty beat up. The guy we bought it from hadn't even advertised the matching armoire, but offered it to us just in case we were interested. It was a little too big for the room as is, but we figured we could do something with it!

Here is the before:


The door was cracked and there were a few chips, nothing that couldn't be repaired, but I decided the part I was really interested in was the drawer section. Making it a tall tower would fit perfectly in the corner of the nursery!

Eric carefully disassembled the pieces by taking off the molding and unscrewing the pieces, then we just had to put the puzzle back together! Luckily this just involved cutting down a few of the boards and reconfiguring the top.


We were left with all these scraps:


Here it is after being glued and nailed back together. Just in case you were wondering, we used a very complicated (and professional) system of weights and clamps to hold everything in place so it would dry correctly :).


A semi-assembled work in progress:


Eric recut and attached the trim and cut down the top and reassembled it with biscuits so we could keep the detailed edge intact.


Here is it all put together. We still need to patch it up a little bit to fill a few of the cut lines but it will be ready for paint this weekend if the wind cooperates!


Can't wait to reveal the REAL finished product!


Baby O: 27 Weeks


Baby O
How far along? 27 Weeks
Maternity clothes? Almost exclusively, getting tired of what I have so I'll be doing a little shopping this weekend!
Stretch marks? None thankfully, hopefully my skin can handle a bit more stretching!
Movement: Lots of moving... he loved the glucose test I took yesterday. Apparently no food or drink and sugary syrup make him a happy guy. He must be my son!
Food cravings: Lots and lots of milk and cinnamon gummy bears this week. It's weird how things I never ate before are so appealing now. Still not loving fast/greasy food.
Can't resist: Shopping... his room is pretty packed and my shower isn't for another month. I'm hoping to wash and organize his clothes this weekend.
Gender: Boy.
Symptoms: A little tightness in my belly when I go for long walks, but nothing too uncomfortable.
Belly Button in or out? Definitely poking out and nice and puffy.
Projects This Week: We hung a few things up in his room and Eric finished assembling the armoire we customized. Now I'm getting ready to tackle an even bigger project, hope I have some positive results to show you soon!
Looking forward to: Still patiently waiting on the arrival of Baby Barrett.... can't wait to celebrate my birthday this weekend with our friends and family and our anniversary next week!

Friday, May 18, 2012

Baby O: 26 Weeks

Baby O
How far along? 26 Weeks
Maternity clothes? Living in, cotton dresses but some of my maternity ones are much more comfortable.
Stretch marks? None... thankfully my big belly is stretching nicely!
Movement: Lots of kicks, jabs, and twitches...
Food cravings: Still drinking a few glasses of milk everyday, but not craving it as much as I was in the beginning. Shockingly, greasy/restaurant food is not appealing so we've been eating at home a lot.
Can't resist: Expanding his wardrobe..... at this rate he will have to wear a few outfits a day to get through his closet!
Gender: Boy.
Symptoms: A little tightness in my belly when I go for long walks, but nothing too uncomfortable.
Belly Button in or out? About 3/4 of the way out and nice and puffy.
Projects This Week: Still upcycling the armoire, it's mostly reassembled so it should be ready for paint this weekend~! And we picked a pediatrician... glad that decision is made and we can move on to preparing everything else!
Looking forward to: The arrival of Baby Barrett.......should be coming anytime now! Can't wait to see if Baby O will have a boy or girl friend!

Friday, May 11, 2012

Baby O: 25 Weeks


Baby O
How far along? 25 Weeks
Maternity clothes? Yes, but I can mix in a lot of my regular summer dresses. Loving the warm weather!
Stretch marks? Still haven't spotted any.
Movement: He is always moving around and I can tell he's already going to be a handful!
Food cravings: Mostly milk and fruit, trying to cut out the sugary stuff!
Can't resist: Shopping for him.... luckily I haven't been tempted by much the past week.
Gender: Boy!
Symptoms: Still very comfortable, but I'm sure that will all change when it's 100 degrees outside!
Belly Button in or out? Still about 3/4 of the way out.
Projects This Week: Still upcycling the armoire, we have a busy weekend ahead so I don't know how much will get done but we're making progress!
Looking forward to: Meeting this little guy... we're ready for him!

Friday, May 4, 2012

Baby O: 24 Weeks

  
Baby O
How far along? 24 Weeks
Maternity clothes? Make up almost my entire wardrobe. I bought a few new things this week, but plan on living in knit dresses for the rest of the summer. 
Stretch marks? None. I have a long ways to go, but hoping it stays that way.
Movement: Constantly! He's starting to kick harder and harder so I'm sure Eric will be able to feel it soon.
Food cravings: Mostly milk with a laffy taffy every now and then.
Can't resist: Buying him clothes...his dresser is already full!
Gender: Boy!
Symptoms: Still very comfortable, just a little harder to bend over now.
Belly Button in or out? Still about 3/4 of the way out.
Projects This Week: Still upcycling the armoire and I have a few more sewing projects to work on.
Looking forward to: Hanging decor on the wall... We've collected quite a bit, now we just need to figure out the best layout!

Thursday, May 3, 2012

Crib Bedding Part 3: Bumper

To finish up the crib bedding I previously posted about here and here, I made a coordinating bumper to match! I know that bumpers are somewhat controversial and not necessary recommended in cribs, but it just doesn't look complete without one! When it comes time for Baby O to actually sleep in his crib we will evaluate whether or not it is a safe option for our family.

I was planning on doing a whole step-by-step tutorial, but this bumper was made specifically to fit our crib so it most likely wouldn't be helpful for me to give you measurements, etc.

A quick breakdown:
1. Cut fabric for front and back of the bumper and piece together into one long panel. I cut my fabric so the seams would hit in each corner and look more like one long piece. Serge the edges to eliminate fraying.
2. Sew (or buy) piping and then pin it along the top and bottom of the front panel (with 2,000 pins) and sew in place.
3. Top with back panel (right sides together and piping inside) and repeat with 2,000 pins and sew in place.
4. Turn fabric right side out and carefully stuff with batting (thickness is up to you).
5. Pin, pin, and pin some more so batting stays in place. Sew vertical lines on top of existing corner seams and then again at equal intervals (I did 1 line for the shorter ends and 2 additional lines for the longer sides). I like how this looks and it keeps the batting in place so it doesn't slide down or bunch up.
6. Sew (or buy) coordinating ties to attach the bumper to the crib.
7. Fold ends of panel underneath and insert two ties, stitch closed.
8. Repeat by adding two ties to each vertical line previously stitched to hold batting in place.
9. Place inside crib and tie, tie, tie!

These are the fabrics we chose, a chain print for the front and a navy/white houndstooth for the inside.


And here it is all put together!


I love it! So much better than anything I could buy and specially made for Baby O!

I have a few more sewing projects up my sleeve, but now we can get to really decorating the room.

Crib Bedding Part 2: Fitted Crib Sheets and Binky Bag!

If you missed Part 1: I posted about making a bed skirt here.

I thought I may be able to find a navy or grey fitted crib sheet but I'm not a fan of jersey bedding so even that has been tough to track down! Luckily making your own fitted crib sheets couldn't be easier.

All I needed was a high thread count full flat sheet and some elastic and I had two luxurious crib sheets in no time!
Start by cutting your full flat sheet in half. I finished off the cut edges with my serger (but you could also just turn them under and stitch). Then I layed the sheet (wrong side up) on top of the mattress and marked where each of the corners were.


Carefully slide the sheet off, stitch down your pin lines, trim off the excess, turn it right side out and put it back on your mattress. If you pinned closely it should fit just right, but you can always take time to tweak it. Then just sewing a casing along the open edges and thread a piece of elastic to cinch up the fabric on the underside of the mattress.

Easy as that! And you can make a second from the same sheet.

I love that this allows me to use nicer quality sheets and different colors or patterns than are typically available in crib sheets. I kept the rest of the bedding just navy and white so I can mix in different color sheets to give the nursery another pop of color. I will definitely be making a stack of these!

Since the sheet was so easy I decided to whip out a binky bag to match!

I've seen a few nursery's with a little bag attached to the crib railing to collect pacifiers. We haven't completely decided if we're going to use pacifiers with Baby O, but just in case, I thought this would be a great piece to have! Who wants to be digging around in the drak in the middle of the night to find one when you could have a cute and convenient place to store them?

I started with a piece of the striped fabric I used to make the bed skirt (16" x 7.5") and an extra scrap of the gray sheet material (14" x 7") and serged the edges. You could make this as big or small as you'd like but mine turned out just right to hold a handful of pacifiers.


With right sides together, fold ans sew the short side together on each piece.


Fold each pocket so the seam is centered in the back and stitch the bottom closed.


I created a strap with one of our other nursery fabrics but you could use anything to tie the bag onto the railing. Turn the larger pocket right side out and sew the center of the strap on the seam.


Insert the smaller pocket (still wrong side out) so when you look into the bag you don't see any seams or serging.


Using the iron, I folded over the edge of the larger pocket to conceal the serging and then again to cover the top of the smaller pocket.


Create a casing by sewing around the edge of the top, leaving a small unsewn space near the back seam.

To make the bag so it was open (and you could easily use one hand to retrieve the pacifier) I inserted a small strip of boning (found in the notions section) in the casing and then sewed up the remainder of the top edge.


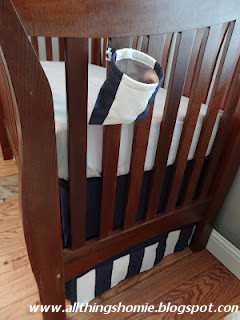
Here it is all finished on the crib:


Now that I have the bumper in place (which I'll be revealing soon!) I think I may move the bag to the other side near the wall so it doesn't look so busy, but I'm sure we'll be thankful to have this in the middle of the night. I'll just have to keep it stocked with a clean selection of pacifiers!

Tuesday, May 1, 2012

Crib Bedding Part 1: Bed Skirt

Once we decided on the nursery theme I started looking for bedding. I couldn't find anything even close to what I had in mind. Most nursery decor is very animated jungle animals, cars, sports, and pastel colors. Not at all what I had envisioned so I decided to sew my own. None of our fabric stores had anything I liked so I ordered all my fabric from fabric.com. Here is what we're using to decorate the nursery:
  

And of course solid navy, gray, and white!

  I went back and forth on how I was going to do the bed skirt and ended up opting for 4 seperate pieces instead of one solid piece (like a normal bed skirt). Right now we have the mattress set at the highest setting so it will be easy to lift Baby O in and out while he's still tiny and unable to move around much on his own.

I could have easily made a one piece bed skirt that would have been long enough to touch the floor, but as we lower the mattress, this would have involved altering the bed skirt for each new level.

Instead I decided to go with 4 seperate panels that could easily be adjusted for each stage. I started by measuring the length and height of each side.

I cut my navy material (a bed sheet that matched our accent fabric) so I would have 2  side panels and a front and back panel. I made the front and back panels a little bit wider than the crib so there would be a little overlap to tuck under the side panels and we wouldn't have gaps at each corner. I also added a 6" panel of striped fabric to the bottom to give it a little more detail.  

Once I finished each panel they were ready to be attached to the spring base. Since the mattress will do a good job of holding them in place I just used sticky velcro to tack it down along the frame. This way I will be able to remove and reuse the velcro as we lower the mattress and move the bed skirt up.


I started with the widest front and back panels so I could tuck the extra fabric around the corner. Ignore the missing floor boards (another DIY project to replace those is in the works!)


Then I added the two side panels to finish it off.


Replace the mattress and you have a custom (adjustable) bed skirt!

Next up: Crib Sheet!